I take the cold chicken out of the fridge and remove all the big chunks of meat that easily come off the bones. Those pieces, I cut into smaller strips or bite-size pieces for use in other meals later (fajitas, casseroles, soups, stir-fry, etc.). The bones and any meat that’s still stuck to them goes into a large pot.
I add water to cover the bones and a couple inches over that. If there are lots of bones & stuff, I may even have the water twice as high as the level of bones. Then I put the cover on the pot, and turn the stove on medium-high.
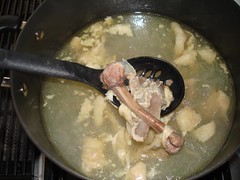
Now a lot of folks add other things to chicken broth such as onions, celery, carrots, garlic, bay leaves, other spices, etc. Those are all great, but I don’t notice a significantly worthwhile addition in flavor, and it adds an extra step to the end of the broth-making that I don’t want to do. J So I don’t add anything. I just let the chicken & broth come to a boil, then turn the power down to low and let it simmer for a couple of hours.
 The length of time it simmers is not that important. It just needs to simmer at least until the remaining meat on the bones wants to fall off. That’s really subjective, but remember, your chicken was already fully-cooked from before, so you are safe to cook the broth as long or short as you want. The longer it simmers, the stronger the flavor of the broth, but the more evaporates away.
 When I think it’s simmered long enough, I use a slotted spoon to remove the chunks of bone, meat, skin, whatever, to a large cutting board. The cutting board I have (Pampered Chef, of course) has a small moat around the outside, so any extra juice that may have come out of the pot with the bones, goes to settle in there, and I can pour it back into the pot. This is really handy. Otherwise, you can expect to get some broth on your counter.
Then after it cools a few minutes, I summon up all my braveness once again and go through the stuff with my hands. This is a careful job, because there are little tiny bones in chicken that like to disguize themselves as meat – and it’s never fun to get a piece of bone in a nice chicken soup. So I am careful to get all the bones out of the meat. All the bits of boneless meat then go into a storage container for the fridge or freezer, and all the bones, skin, cartillage, etc, go into a bowl for disposal. If you had put in all the extra stuff – veggies, spices, etc – you would have to throw all those away now, too.
I pour the broth into a large storage container to cool. As you pour it, you’ll notice it’s not beautiful and clear. If you planned to make a professional-looking clear golden chicken broth-based soup, you’d need to strain all this stuff out. But you’d also lose all the flavor and nutrients you find in that floaty-stuff. So I don’t strain it. When I make soup, there’s enough other stuff in it, that you can’t tell that the broth is not clear.
If it’s cool outside, I will set the container outside for a while before sticking it into the fridge – just because that’s rough on the fridge to have to try to cool a big container of hot broth.
The broth really needs to sit in the fridge at least overnight. This gives all the fat a chance to rise to the top. Carefully take the container out of the fridge – you don’t want to slosh it around. Carefully take off the lid and you will see a nasty solid layer of chicken fat. Take a spoon and get all that out and throw it away! It’s SO easy to scrape off. The kids actually think it’s fun. Now you have practically fat-free chicken broth that is SO flavorful! At this point, you can put it into smaller storage containers for freezing or you can just start making soup!
No comments:
Post a Comment